• Skip to primary navigation
  • Skip to main content
  • Skip to primary sidebar
  • The Famous Blog
    • Blogging
    • Social Media
    • SEO
    • Marketing
    • Design

Famous Bloggers

How To Blog and Start a Business

  • Contribute
    • Submit News
  • Login

Home » The Famous Blog » Quick and Easy Color Correction Using GIMP

Quick and Easy Color Correction Using GIMP

May 24, 2010 - Last Modified: April 1, 2014 by James Johnston 8,986

Picture Editing

Today I wanted to go over some basic picture editing skills. To be more specific, color correction is what I want talk about. Color correction is something everyone using social media should know and it does come in handy when working with images on your blog.

Picture editing doesn’t always have to be done by professionals and it does not have to take that long time to edit an image. The casual user can easily edit a picture using free software programs and have success.

In technical terms, Color correction is the removal of unwanted color cast. What I mean by this, is we are taking a white washed image, faded images, and images that where not process correctly using a point-and-shoot digital camera macro and we use software tools to correct these issues. If you’re still not sure what I am talking about, think of a picture taken on your camera phone in low light conditions. The picture can be a little dark and maybe the color isn’t quite right. Pictures like this can be fixed. It does not take much effort to do it. I will show you how in today’s design quick tip.

Technical Info

The first thing I recommend to do is backing up your images you plan on editing. With today’s prices for cheap storage options, there is no reason not to store and back up your images. By making a copy if your images, you will not run the risk of accidentally destroying pictures that can not be replaced. If you have limited funds, and only a few images to store, get yourself a four gig USB flash drive to store your backed up images. If you have a little more of a budget get a large external hard drive. You can pick these up for around fifty to hundred plus dollars.

Second thing you need to do, is calibrate your monitor. Un-calibrated monitors may represent incorrect colors on images and when you try and color correct them, you will not correct the colors in the image correctly. For most users this doesn’t make much of a difference but for designers and web developers, this can be a big deal and can cause a lot of headaches that can simply be fixed by spending a few minutes to calibrate your monitor.

Software

There are a lot of great image editing programs out there. So which is the best? That’s really up to you and what your needs are. For me, I am an Adobe Photoshop fan, but there are times when I can not use Photoshop and I have use free tools. When this happens I recommend using GIMP. GIMP is a powerful tool and many professional use GIMP over most premium programs.

GIMP can be confusing, and can turn some people off of using this program. Just give it some time, if anything just using the basic tools will help you show off better images to the world.

Basic Color Correction

Gimp before after

For those that already know color correction and how to use these tools, know that auto correction isn’t the best option for color correction. But for our purposes today, auto correction is the easiest and the fasted way to get good results. When I edit personal images that are for my use only, I generally just use the auto correction tools. If I am working on a client project I will use the manual tools until I get the color to what the clients wants.

After opening the image in GIMP, you will need to take a good look at the image and decide what it needs. The first thing I usually do is correct the white balance. So go to Colors >> Auto >> White Balance. This will correct the white balance, and bring more color into the image if needed.

GIMP screen 1

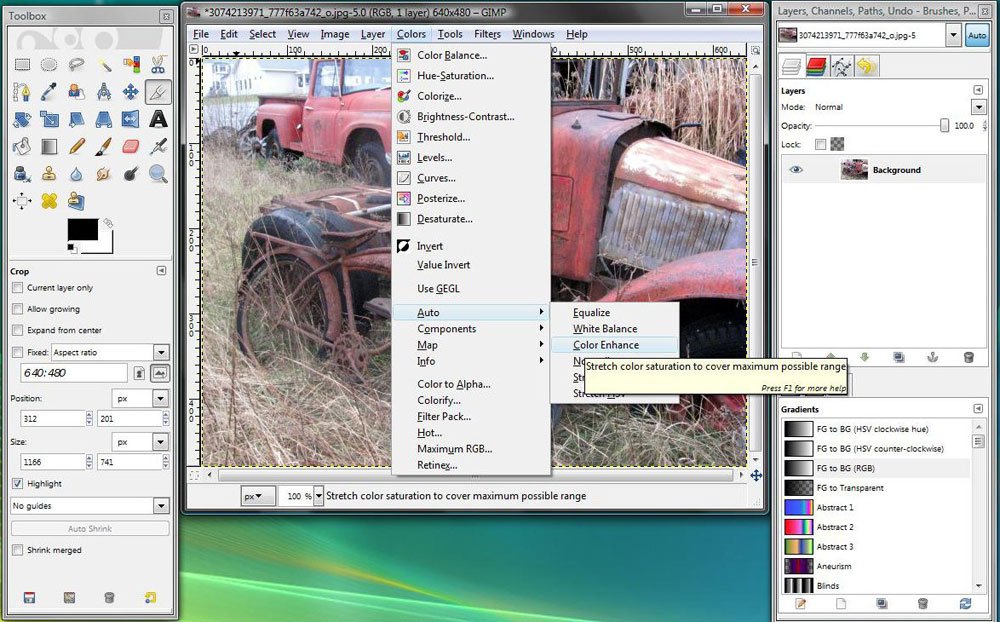
The last step is to correct the color. In the case of this image, it needs to be brightened and remove some of the white. In order to this you want use the Color enhance tool. This tool will enhance the colors and make the reds stand out more. Go to Colors >> Auto >> Color Enhance. This will automatically stretch the color contrast to cover the maximum possible range.

GIMP screen 2

There are more auto correction tools you can use but, in most cases you will only need to use these two. Most modern point-and-shoot camera have excellent macros that can catch those everyday moments and will do a god job of making stunning images. But macros aren’t perfect and you may have to touch a few up them before showing them off. For this tutorial, these tools will help enhance your image and give you back some of the natural colors that can be dulled when using a camera.

ShareTweet

Filed Under: Design

About James Johnston

Follow @element321

spends most of his free time using social media and loves to teach others about design, web development, CSS, SEO, and social media. He is addicted to Wordpress, and social media. You can reach him website, Evolutionary Designs Blog.

Reader Interactions

Related Posts

  • Impress More Of Your Website Visitors5 Easy Ways To Impress More Of Your Website Visitors
  • Responsive Designs Boost Clients’ Morale
  • Thesis 2.0 Awesome and Unique Site Designs That You Should Check Out
  • Is a Custom Design Essential to Your Blog’s Success?

{ 15 Responses }

  1. Angie says:
    I'm really glad I found your link. I'm still trying to learn how to use GIMP.
  2. Kristi Hines says:
    Great tip! I would like to see more GIMP tutorials, as most of the graphic design sites focus on Photoshop, and GIMP is one of the best free, open source alternatives.
    • element321 says:
      Thanks, Kristi. I was planning to do more tips for GIMP and some for Photoshop over the next few weeks either on this site or on my site. As for GIMP, my skill are limited. I only use it for basic editing when I am on a computer that doesn't have Photoshop.
  3. Ms. Freeman says:
    Superb information. Gimp looks like its a free tool. Is this correct? If so I am definitely going to give it a shot.
    • element321 says:
      Hi Ms. Freeman, Yes, GIMP is free. Check it out if you need any help getting it setup. Send me a message via twitter or through my contact fr0m my site.
  4. Murlu says:
    I've used GIMP from time to time but since I have Photoshop, it's my main tool. GIMP is a really great tool for those that don't have PS though, tons of powerful editing tools built in. On a side note, a picture can really make your blog posts stand out. If the picture is dull, it seems to give a "blah" expression throughout the post but something that's very bright and colorful cheers you up and gets you right into the post.
    • element321 says:
      Murlu, My thoughts exactly. Its so easy and quick to fix as most can see. I get tired of logging on to Facebook or checking out a blog and I see a dull image that could have been easily fixed in a matter of minutes. All though, I do see why some may not fix all of them. I have 20o images from one trip and another 500 images from a vacation from a trip last summer that I still need to color correct and upload them to Facebook and Flickr. Those short couple of minutes will add up if you 20 + images to work on...
      • Murlu says:
        Relevant to the topic, a friend just today was discussing with me the possibility of making money from photo editing. Many times you have (as you said) hundreds of images that are going to take a massive amount of your time when you start to reach the hundreds (and thousands). This is where you can step in - offer your services to touch up photos and submit them back. A few examples where you can put this to work are: Weddings eCommerce (for product pictures) School photo shoots That's just to name the few and if you charge a reasonable rate for each, you could see quite a chunk of change at the end of the job. It's funny how when you think of even the skill of photo editing has the possibility to generate you some nice online income.
  5. element321 says:
    I agree Photoshop is the best I use CS3 on my laptop and CS4 on my desktop. Both are great tools for design and image correction. I only use GIMP when I have to. Its a great tool but it takes time to learn and get use to its layout.
  6. Sunil Jain says:
    Hi James :) It's good to hear that you are recommending GIMP . I haven't tried it yet , but will try for sure. As per my knowledge , There are few online sites which give color correction to your photos , but you are also telling that GIMP has some basic tools which are quite innovative then Let me try it once ;)
    • element321 says:
      It is true that online image editors are a bit limited. They work for basic cropping and editing but most will not allow you color correct. That is why I recommend GIMP. You can even get a portable version that can be installed on a USB drive. I mainly use the portable version but my knowledge of GIMP is a bit limited.
  7. Dev says:
    Hey James, Awesome post man. I have used GIMP, but not able to use.. !! Though i think photoshop is best tool for editing.. :D!! Great tut..! Thanks for sharing this great post.
    • Nasif says:
      Yes Dev Photoshop is the best...

Primary Sidebar

Our Newsletter

Our Newsletter

Join our mailing list to receive the latest news and updates from our blog.

You have Successfully Subscribed!

Popular Articles

  1. Top 10 Sites Where You Can Get Paid to Write 115,645 views
  2. How to Get Targeted Twitter Followers Fast 92,035 views
  3. How to Set Half Rating Scale 1-5 (Poor to Excellent) by Words 86,539 views
  4. 66 Awesome Social Media Quotes 78,368 views
  5. 50 Traffic Sources You Should Milk Like Crazy 75,080 views
Schema Structured Data for wordPress
  • Blog
  • Contribute
  • About Us
  • Contact Us
  • Disclosure Policy

Copyright ©2020 · FamousBloggers - All Rights Are Reserved · Powered by Genesis Framework

  • Login
Forgot Password?
Lost your password? Please enter your username or email address. You will receive a link to create a new password via email.
Go to mobile version